How To Accept COLX As A Merchant


While the COLX Team continues to make improvements to its blockchain technologies, with the culmination of work resulting in the release of a distributed computing project called Colossus Grid, the focus has always been on user privacy and widespread currency adoption.
COLX currently provides users anonymity in transactions through the Zerocoin protocol and is moving full steam ahead to further enhance user’s privacy with the soon to be release additional protocol name ARMIS.
ARMIS is a free, decentralized, anonymity technology based on I2P’s open specifications. Our technology uses both encryption and sophisticated routing techniques to create a private overlay network across the internet which strengthens a user’s privacy. This protected network allows users to hide their geographical location by obfuscating their ip address, replacing them with encrypted identities.
As user adoption is the key to establishing real usage of ColossusXT and although the work is being done to integrate COLX into Crypto Point of Sale Devices, we believe that the time is right for merchants to start accepting COLX as a payment method using the Android wallet for now. Whether you own a cafe, local retail store, charity shop or any other business, you now have the exciting chance to become one of the first real adopters of COLX and hence an ambassador for the rest of the privacy loving community.

Here are the steps to start accepting COLX:
The merchant must have an android tablet or mobile device, They should then proceed to download the COLX MOBILE APP from the Google Playstore
- Once installed, Open the wallet and follow the information guidelines to learn more.
- Now depending on the country, your merchant is operating from they would definitely want their wallet to show their currency. So click the menu bar on the top left, Select Settings and scroll down until you find the preference heading and select Currency Rate, Now browse down and select your currency of choice, for example, GBP for Great British Pounds.
- For Merchant safety opt them to take A mnemonic backup of their wallet, This is a set of words that will allow them to recover their COLX funds on another mobile device running the COLX mobile wallet, To do this simply go to the Settings section again and select Backup Wallet You can then put a password in to create a backup file or even better proceed to select the 3 dot menu bar on the top right and click Mnemonic Code, Proceed to write down these words and keep them private as they hold all of your COLX addresses and funds.
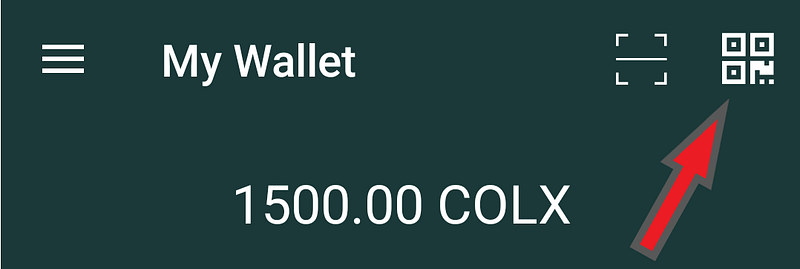
- You are now completely set up to accept COLX, When a client wants to pay you via COLX you can simply click the QR code icon on the top right of your COLX mobile wallet and allow them to scan your QR code and pay you. Your funds will show instantly once your customer pays you, as long as your wallet is completely synchronized. If you aren’t in sync yet don’t worry your funds will show up the second you are!
To ensure that you can accept and represent COLX to the fullest capacity, once you decide to integrate COLX in your store, our team will send you a complete package which will include — A COLX T-shirt, Business Ambassador status on our website, COLX printable stickers, Brochures, Business cards and 50,000 COLX coins (subject to change as the price fluctuates)…..Here’s your chance to be part of something colossal!

For online stores see this link to use a COLX cryptocurrency payment gateway — https://mycryptocheckout.com/doc/installation/
